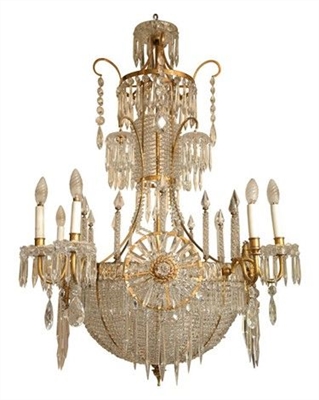
Lamps in a false ceiling are a popular option for lighting a room, the attractiveness of which is due, inter alia, to the compactness of the equipment and the simplicity of daily care for it. The maintenance of the fixtures also does not require special skills, since with the correct installation of the wiring consists only in replacing the blown bulbs. However, several types of luminaires are used in suspended ceilings, and different lamps are also installed in them.
Consider how the bulbs change in various types of ceiling lights, so that if necessary, perform this operation quickly, without wasting time studying the design.
Safety precautions
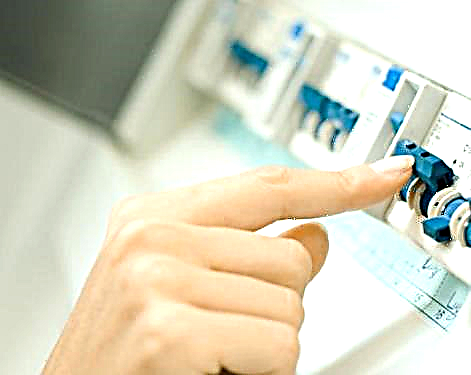
Important! Before performing any electrical work with fixtures, it is necessary to de-energize the room's ceiling lighting system - always from the apartment panel.
Modern wall switches work to open both wires of the wire - phase and "zero". But on sale and operation there are still switches of an obsolete design, opening one conductor - according to the rules, they must be a phase wire ("minus"). It is impossible to exclude the possibility that such an outdated device was installed in the apartment, and its connection was made with a phasing error - then in the “off” position it will open “zero” and the lamp holder will remain energized. After turning off the “machine” on the dashboard, electrical safety of the work will be ensured.
In most cases, the bulbs in the ceiling lights change from some kind of elevation - a stepladder, a stool.
The support used must be strong and stable in order to minimize not only the risk of the employee falling, but also the chance to stumble at height - suspension and tension structures can be easily damaged if you grab them if you lose balance. .
How to choose a new lamp
The surest way to choose a lamp for replacement is to remove the burned out and take it with you to the store as a sample.
If a plate type lamp is installed on the suspended ceiling, then the ceiling is removed from it - the method of its fastening is easily determined visually, most often these are spring-loaded legs along the perimeter or threaded fasteners of decorative design.
On a device without a shade, the bulbs are clearly visible and convenient to replace.
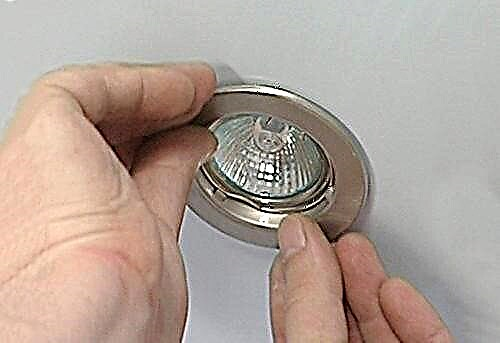
On spotlights - spotlights, there is no ceiling; its role is played by the frontal surface of the bulb. Such products are easily removed from the nest in the ceiling - you just need to gently pull the lamp housing down to overcome the resistance of its internal spacer legs, which press the product against drywall or universal suspended base (in suspended ceilings).
To replace the light bulb in such a luminaire, most often it is not necessary to dismantle it - just remove the retaining ring (spacer or threaded type), and it will sag on the supply wire below the ceiling level.
In this position, the blown bulb is easy to disconnect from the wiring - use it as a sample when buying a new one or immediately replace it with a working one.
Types of lamp bases for ceiling lights
Lamps of suspended ceilings use several types of lamps, the installation and connection of which depends on the type of base. In order to avoid damage to the lamp or ceiling decoration when replacing the light bulb, we consider the socles of the most common types.
By the method of connection - the type of socle of the lamp used for lighting on a suspended or suspended ceiling, are divided into threaded and pin.
With threaded base halogen, fluorescent, LED and incandescent lamps are available. In spotlights, the most common are 2 types of socle - E27 and E14 ("minion"), where the number is its diameter in mm, and E is "Edison".
With pin caps halogen and LED lamps are available.
Bulbs with smooth pins, which, when connected, only need to be inserted into the socket, are marked G. Their characteristic feature is the close proximity of the luminous element to the ceiling, which ensures diffusion of the light.
Bulbs with bulges at the ends of the pins are marked GU (except for GU5.3, manufactured with contacts of constant thickness). After inserting into the cartridge, such bulbs also need to be turned a certain number of degrees, after which the bulges on the pins become something like pressure anchors and provide a more reliable fixation of the product in the socket.
In the marking of pin lamps, next to the letters G or GU there is also a number, which means the distance between the pins in mm, for example, GU10 - 10 mm.
Bulbs with a GU type cap do not create a diffused, but a directed stream of light, since their luminous elements are recessed in the lamp housing.
Replacing Spot Lamps
Each type of base corresponds to a certain way of fixing the lamp, but they are all more or less simple to perform. Least of all questions is the replacement of bulbs with a threaded base, but in this case, in addition to its diameter, it is necessary to take into account the size of the bulb and the power consumption of the product when buying. In addition, by screwing a halogen lamp into a cartridge, you can’t touch its bulb with your bare hands - contamination with grease will reduce the life of such a bulb.
There are nuances when installing energy-saving lamps with a bulb-tube of any configuration - they can not only be touched directly, but they should be kept in rotation only by the body of the electronic unit (plastic section above the base).
GX53 Bulb Replacement - Tablet Type
Changing such bulbs is the easiest - there is no need to remove the lampshade or remove the lamp from the socket in the GCR.
While holding the lamp housing from turning with one hand, you need to turn the lamp counterclockwise by about 15-20 degrees - until it clicks, and then slightly pull it down. At the same time as removing the lamp from the socket, its contacts disconnect.
Installing a new bulb of this type is performed in the same way - after insertion into the seat, it is turned clockwise by the same amount (until it clicks), resulting in a combination of contacts and fixing of the product in the housing.
Replacing lamps with pin caps
Bulbs with a type G base are pulled out of the socket without turning - their contact pins have no bulges, so you just need to carefully pull the product out of the lamp housing or lampholder. Installing a new lamp is performed in the opposite direction - by inserting the pins into the cartridge until it stops.
GU type plinths require turning the lamp when removing or installing it - counterclockwise and along it, respectively. Confirmation of the correct insertion of the product will be a click at the end of the manipulation.
Recommendations for replacing lamps in suspended ceilings
When purchasing a light bulb, you need to make sure that it is suitable for the voltage of the lighting system, since both under 12, under 24, and under 220V, the bulb size can be the same.
Instead of a blown lamp, it is better to install the same type, or replace all the bulbs with products of a different type.
The new bulb should not exceed the power of a blown out one - a more powerful product can damage the PVC fabric with increased heat generation. In addition, the deviation of the power of the new lamp in any direction will distinguish it from the rest of the spots and violate the uniformity of lighting.
It is more convenient to remove or install bulbs with bulges on the base pins in thin rubber gloves - they will reduce the slipping of the product in your hands when turning.
This video will help to supplement the idea of lamps used for suspended and suspended ceilings:
Conclusion
Replacing a light bulb in a suspended ceiling lamp is not a difficult operation, especially after two or three executions. As for the first independent manipulation, then it, when the rules and recommendations are followed, is quite within the power of any home master. However, it should be remembered that simplicity of execution is only low labor costs, but there is no reason to neglect safety measures.
Replacing GU5.3 and MR16 Products in a False Ceiling
Lighting fixtures, which are installed in suspended ceiling structures, have two main parts:
Functionality includes frame and clamps.

The work associated with the replacement consists of 4 stages:
- Power outage. First of all, you should de-energize the room where the replacement is to be. To this end, turn off the lighting circuit breaker in this room. It is permissible to use a switch on the lamp, but you can not be sure that it will break zero, not the phase. The fact is that if the masters made a mistake when arranging the lighting, then the phase wire will remain energized, even when the light is off. It is better not to put yourself at risk and carry out all power outages directly in the shield.
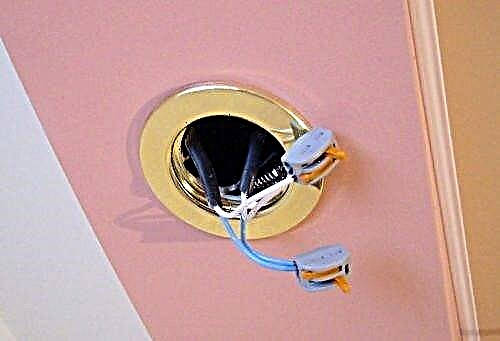
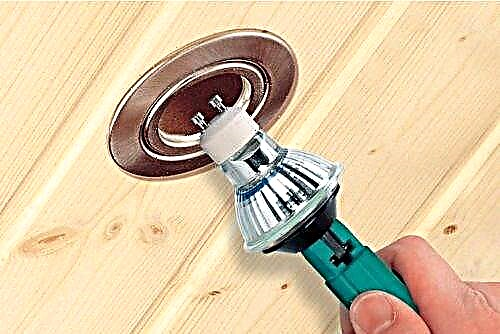
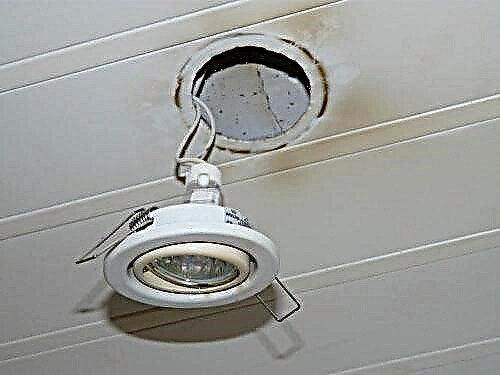
- Dismantling a burnt bulb. First remove the main retaining ring, which performs the function of the latch. To do this, remove the two antennae, after which the bulb itself falls out of the housing, while it hangs on the contact cartridge. Then it is removed from the contacts by turning the GU10 model counterclockwise or by pulling the MR16.
- Mounting a new lamp. Before replacing a light bulb in a suspended ceiling, it is necessary to compare the power and voltage indicators on the new product with those on the burned-out one. Lamps can have the same shape and different supply voltages. For example, instead of 220V, 12V will appear. The main thing is that the power should correspond or not exceed the previous value, otherwise it is very likely that the lamp will overheat or if the power supply is overloaded. When all the data matches, plug connectors are inserted into the contact sockets of the lamp to be installed on the cartridge.
- Reinstalling the lamp and fixing. Again use a snap ring. His ears are squeezed, placed in grooves and released. After the lamp is fixed, turn on the lighting.

There are models that do not have snap rings. In this case, before you change the LED lamp in the stretch ceiling, you will need to completely remove the lamp from the ceiling structure.
In some cases, there may be problems with the steel mounting rim, as he does not want to hold on and begins to fall out all the time. This is explained by the fact that the lamp did not fall into place in the lamp, as a result of which the housing closes the grooves intended for the ring.
The reasons for this may be the following:
- springs deformed the body of the lighting device,
- since the springs are of the wrong size, they begin to put excessive pressure on the body - this usually happens when several bulbs are replaced at the same time, when the rings are reversed and not installed in their original places,
- the ceiling structure is mounted at an insufficient distance from the ceiling and the lamp with the bulb rests against the plaster.
How to change the lamp GX53
It is believed that replacing the GX53 lamp in the suspended ceiling is easiest:
- holding the lamp housing with your left hand, the product is slightly rotated about 20 degrees in a counterclockwise direction until it clicks,
- take out the bulb by pulling it down
- install and fix in place a new product by combining the contacts and then turning it, only now clockwise until a characteristic click.
Before replacing the lamp in the ceiling lamp, it is not necessary to pull out and dismantle the device.
Incandescent lamps
This is the first source of artificial lighting that people have been using for more than a century. Such elements for devices located on suspended ceilings are considered inefficient, since only 2% of the energy consumed is converted into light. Another significant minus is associated with strong heating of the case. High temperatures emit significant heat that enters the non-ventilated space between the base ceiling base and the surface of the decorative structure.
Due to the strong heating, incandescent lamps cannot be installed on stretch ceilings, since the PVC film will quickly melt. Therefore, they can be used here only in classic chandeliers, located at a distance from the decorative canvas.
Also, such lamps have significant dimensions, and the length of the elements can reach 15 cm. Therefore, they are not the best option for suspended ceilings. Among such a variety of minuses, only two advantages can be distinguished: budget cost and the possibility of uninterrupted operation in rooms with high humidity or low temperatures.
Halogen
Before stretch ceilings gained popularity, these lamps were installed only in searchlights and headlights of vehicles. However, over time, they have proven themselves well, and are now very often used for lighting suspended ceilings. They have the following advantages:
- have a long service life (up to 10 years),
- immediately gain power after turning on,
- wide range of colors
- a special range of lighting, saturating the rays,
- the ability to adjust the angle of illumination.
Using halogen lamps on PVC film ceilings, you can create an amazing design.
However, such devices have their drawbacks:
- consume a lot of energy
- generate a lot of heat
- require the installation of additional ventilation in the room,
- quite expensive.
But all the shortcomings pay off with a long operational period, during which you do not have to worry about the failure of the light source and its replacement.
Energy saving
Their name speaks for itself. The main advantage of such elements is the consumption of a small amount of energy during operation. Such sources include fluorescent lamps.
They have the following advantages:
- profitability
- compactness
- variety of designs.
The main disadvantage is the fragility, which decreases in proportion to the number of times the bulb is turned on and off. The more such manipulations with her will be carried out, the sooner she will become worthless. For such products, frequent voltage drops, which negatively affect their performance, are also undesirable. However, with proper operation, the uptime of an element reaches 5 years.
These lamps are not recommended to be installed in lamps for illumination of rooms with high humidity.
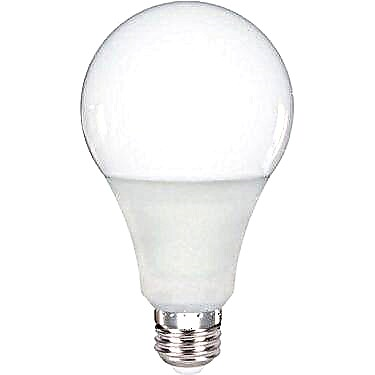
LED
The newest source of artificial lighting, which in a short time managed to gain recognition and popularity among consumers, thanks to the following advantages:
- long service life (more than 10 years),
- profitability. According to this indicator, LED lamps correspond to fluorescent elements,
- the light emitted by them does not irritate the eyes,
- special controllers that come with the kit or are purchased separately allow you to adjust the lighting intensity, change its shades,
- With the help of LEDs, you can organize directional lighting in the room, focusing on a specific area.
The main disadvantage is their high cost.
Such lamps can be made:
- in the form of an independent device completely ready for work. Then, if the LED fails, you will have to completely change the device, since it will not work to insert a new bulb,
- in the form of a body lamp, in which it is possible to replace a faulty light source.
Separately, it is worth mentioning the LED strip, used as decorative lighting or for additional lighting of a specific area in the room.
Thus, for spotlights on a suspended ceiling, it is better to use halogen, fluorescent or LED bulbs.
Component Designs
Almost all fixtures have a similar design, including:
- wire and cartridge holding housing
- clamps to ensure reliable fixation of the lamp housing,
- protective cover made of glass or plastic,
- a clamp with which the entire installation of the structure is fixed to the ceiling.
If you know about the structure of all elements, replacing a burnt out bulb will be much easier.
How to change a light bulb in a stretch ceiling
Replacement of bulbs in the lighting system of a false ceiling should be carried out with the obligatory observance of a clear sequence of steps. You need:
- turn off the power on the shield,
- provide a stable support with which you can reach the light source (stepladder, table),
- dismantle a failed lamp,
- replace it with a new one,
- check the performance of the item.
Dismantling a broken item
On the one hand, difficulties in replacing a light bulb should not arise. But there are non-standard situations when, for example, the cartridge has broken, and part of it has remained in the device. Therefore, it is very important to properly dismantle the defective element.
Follow these guidelines:
- lamp with right-hand thread. It is often used in conventional devices, so it is familiar to owners who often themselves change light sources. The right-hand thread is typical of conventional incandescent bulbs. They get out the easiest
- bulbs, the fastening of which is represented by two pins. They are led into grooves located on the housing of the lamp or spot. To unscrew such a lamp, you need to turn it counterclockwise until a characteristic click. Having turned out a bulb from a false ceiling, it is replaced with a new one. If the click doesn’t happen, it means you made a turn in the wrong direction, or twisted the case more than you needed. Similar fixtures are used in halogen lamps,
- light bulbs with antennae (halogen or LED elements). Before removing the light source from the stretch ceiling, press on the locking ring, take it out. Then carefully pull out the light bulb. Thus, it will turn out to get close to the “socket”, to which the lamp is fixed with the help of the “antennae” (two thin wires). To get it, you need to hold the nest with your hand, and pull the light bulb towards you.
Before replacing a failed bulb with a working one, you need to understand what type of mount it is equipped with. It’s good if you mounted the devices in the tension structure yourself, so you probably know how to dismantle the device. If not, you can mix it up and start twisting, for example, an LED lamp that you need to remove. This way you damage the nest.
Setting a new source
If you were able to dismantle the unsuitable element, proceed with the installation of a new one. New lamps installed in luminaires must be of the same type as the previous ones. As for power, it can be less or more. The installation order also depends on the design features:
- Installing a simple incandescent lamp is as easy as removing it from the lamp. They gently screw it into the base,
- if you change the halogen bulb, be sure to wear gloves, as such products become soiled quickly, and even clean hands often leave traces. Because of this, the element quickly burns out,
- To install the halogen lamp, insert the pins that are on its body into the grooves of the lamp, then turn the lamp counterclockwise until it clicks. This method applies only to halogen lamps enclosed in a housing,
- the bulbs with “antennae” are fastened into the socket, after that the fixing ring is installed back,
- LED lamps change in different ways. The selected method is affected by the type of ceiling lamp. If it consists of a housing and a light bulb, then the replacement of a failed element is carried out by analogy with halogen bulbs with “antennae”. If the lamp is integral with the lamp, then the device changes completely. It is first pulled out of the socket, and the connecting wires are disconnected. Then install a new lamp, which is connected to the power.
As you can see, the process of replacing a light bulb on a suspended ceiling is completely uncomplicated, so you can easily manage the job yourself. The main thing is to correctly determine the type of light source and follow the instructions.
False ceiling as a light source
Before installing a false ceiling, a frame is assembled from wooden bars or from a metal profile, which are directly mounted to the concrete or wooden ceiling of the room. Then the ceiling itself is attached to the frame. In the role of the ceiling material of such a ceiling, for example, drywall can serve. But also such ceilings can be stretch, in which the ceiling coating is made of strong synthetic material. These designs perfectly hide all defects of the main ceiling of the room and give it a flat and smooth look.
Between these two ceilings (main and suspended), thanks to the assembled and fixed frame, a free space of up to 10 cm is formed. Electrical wiring for connecting future lighting and the basic elements of the light source construction are hidden in this empty space. To connect fixtures and various light sources in this ceiling, special holes are made. A distinctive feature of such a ceiling is the ability to install built-in fixtures.

General bulb replacement tips
Very often, false ceilings are equipped with point light sources, in which, of course, light bulbs are located. Whoever assembled the design of such a ceiling knows how to replace bulbs. Those who have been installed by the company may not have such knowledge, in this case it is better to call a specialist or find the necessary information on the replacement and try to replace it.
In most cases, the main reason for the replacement is its burnout. And the way to put another one depends on which version of ceiling lighting you have - an ordinary chandelier or lamps.
If one of several lamps in a pendant chandelier burns out, do not immediately change it. In this option, it is more convenient and safer to wait for daylight hours, and in daylight, replace a burned out one. And if the need forces you to start replacing in the dark, find an extraneous light source, such as a flashlight. You may need a pair of pliers and a screwdriver; better to wear gloves on your hands.
Before replacing, it is necessary to de-energize the repaired light source by turning off the machine or wall switch.
A new light bulb should be at hand so you can spin it at any time.
Never turn on the light after replacement; do not look at the light source, do not stand under it, because the option of marriage in the light bulb is not ruled out, and when it is turned on, it may burst.
The type of lamp used in the suspended ceiling
In the suspended ceiling, four types of light are mainly used.
- Halogen. This view can be installed with the smallest space between the false ceiling and the main one. Halogen lamps can brighten a room quite brightly, and replacing it is a bit more difficult than a regular light bulb. Care must be taken when replacing. The operating time of this type of lamp largely depends on the correct installation. In a household network, frequent voltage drops occur, which do not for the better affect the operation of the light source. To do this, it is recommended to use voltage stabilizing devices.
- Conventional incandescent bulbs. Each of us has known these products since childhood, and changing them is not difficult and knowledge. But conventional lamps have one significant drawback, they quickly heat up and therefore are not suitable for all types of suspended ceilings.


- Fluorescent lights. This type of lighting devices, even despite their high cost, has become widespread. They are very economical and consume the least amount of electricity, and their lighting characteristics are much higher than previous samples. They have a number of negative qualities - products with a hot start light up more slowly than other analogues, have a limit on the number of starts and stops, and they contain mercury vapor, which further complicates the disposal process.
- LED bulbs. A more economical and long-lasting option for this type of ceiling. Their brightness sometimes surpasses the similar characteristics of luminescent products. The operational period of LED lamps reaches 72,000 hours of production, a conventional lamp has only 1,000 hours.


When changing various lamps, it must be taken into account that two types of socle are used for them. The first is with the usual right-hand thread and is used for a classic cartridge. Most of us know how to change a light bulb with this view. The second option is a G-shaped base with various types, the lamps are installed using the existing two pins. These pins have a guiding function, and a firm hold occurs after a characteristic click.
It is not recommended to put pressure on the lamps when replacing it, if it does not fasten, just pull it out and try again, the pins may not always get into the guides of the G-shaped form the first time.

Mounting Methods
Three options are used to mount various light sources, and the change is carried out in different ways. Before replacing a burned-out light bulb, it is necessary to turn off the voltage and prepare a reliable base on which you can stand. It can be a stepladder or a stool. Replacement should only be started when it cools down, otherwise there is a risk of burns.
- The first mount is standard. It occurs by twisting the lamp into the lampholder. To replace it, you just need to unscrew it and tighten a new one until it stops.
- Two pin mount - this mount is inherent in halogen lamps, they are held by two metal guides. To replace, you must unlock the latch - holding the lamp with one hand, the second at this time bend the retaining ring. Then they take out a light bulb and insert a working one. After a characteristic click, fix the latch. For this procedure, the suspended ceiling does not require disassembly, the retaining structure of the lamp does not come out of the hole.
- Special cartridge. This fixture prevails with fluorescent and LED lighting fixtures. When replacing, as in the previous version, the lock is removed, the glass is taken out and the light source is twisted. This cartridge must be turned ninety degrees when changing.
Replacing a bulb
Before replacing this type of lamp, first remove the cover or frame if necessary. Then, holding the cartridge, I unscrew the bulb counterclockwise.
It is better to wrap the cracked lamp and get it out of the cartridge, while trying not to look at it, in order to avoid splinters in the eyes. If the lighting device explodes, the remaining glass is also removed with any soft cloth, and the base is twisted with pliers. When twisting a new bulb, you do not need to exert much effort, you can break it.
Fluorescent lamp replacement
A fluorescent or energy-saving lamp, unlike an incandescent lamp, has a fluorescent tube. Changing such a light source is very simple, there is a choke next to the base, and with this device it is easily pulled out.


Replacing the LED lamp
When replacing a light source on a suspended ceiling, first turn off the power to the source by turning off the power source. Then prepare any stable stand that you can stand on without risking falling, and you can conveniently change the light bulb. When replacing a lamp on a stretch ceiling, be extremely careful and careful, such a coating can be easily torn or cut.
To replace this type of lamp, the locking ring must be unlocked. Then get it and pick up a worker of the same parameters. After replacement, insert the retainer ring into place and lock the lamp in the mount.
There are some tips when replacing a lamp in a suspended ceiling:
- Provided that the design of your ceiling provides for the presence of yellow LED lamps, but this lighting is not enough for you, get the standard white ones. The lighting level will immediately increase, but at the same time, the amount of electricity consumed will remain at the same level.
- To increase the life of the lamp, do not take it with your bare hands; it is more advisable to use cloth gloves when replacing it.
- Always remember that stretch ceilings may not withstand the effect of an overly powerful lamp. To prevent damage to the ceiling, use lamps with a maximum power of 35 watts.
- For the ideal effect of transmitting lighting to the ceiling in one room, use lighting fixtures of the same design. Thus, you will achieve not only the desired lighting, but also an attractive appearance in the interior. And if, due to some circumstances, you cannot find the right one, change them all.
And so that this situation does not happen again, you must always purchase them a few more.


Replacing a halogen bulb on a suspended ceiling
If you have halogen lamps in your suspended ceiling, it will take a lot of effort to replace them. Such lighting devices have several advantages: they are not dazzling and have a well-perceived soft and pleasant light. The life of such lighting devices is not more than five years, but it is much longer than a conventional lamp.
When replacing, it is necessary to cut off the voltage supply and carefully remove the holding device that secures the light source. Having reached the cartridge, unscrew the faulty and change to a new one. Then install the mount and securely lock.

Changing any light bulb, no matter what type, does not require special experience and knowledge, there is nothing complicated in this process. You may encounter only one problem when replacing - you may not be able to find a suitable model.
Therefore, it is recommended that you always buy them with some margin in order to avoid such problems in the future.

Lamp replacement recommendations
When replacing lamps on a stretch ceiling, always adhere to the following rules:
- always turn off the power to the light,
- you need to verify the integrity of the wiring and the reliability of the contacts,
- always consider what voltage they are designed for,
- with mechanical damage to the fluorescent lamp, it is necessary to carefully clean the remaining traces when broken from the walls and ceiling, because they contain mercury vapor,
- if the halogen lamp is not pulled out, then it is better to get the entire lamp, after which it can be easily removed,
- it is necessary to familiarize yourself in advance with the technical data and the features of using certain types of light sources for a suspended ceiling.
See below for how to replace a light bulb in a spotlight.
Reasons for frequent burnout of lamps in a suspended ceiling
There are several reasons for frequent burnout of light sources:
- The wrong connection scheme was used,
- poor quality of the connection of the light source to the supply wires,
- low quality product selected
- cartridge malfunction.
These reasons are today the main ones.
How to replace a LED bulb in a suspended ceiling
Before you purchase a new LED lamp, it is recommended first, while still in the store, to make sure that it is working. You can use testers for this.
If during operation it became necessary to replace the LED light source, then the following work will be required:
- Remove existing fixtures from the LED lamp.

- Remove insulation from electrical wires. Gently disconnect the wires.
- Replace the LED lamp according to the attached instructions. Connect the wires to the light source.

- Restore electrical insulation. Hide the wires and replace the lamp cover.


In the event that quite often the lamps burn out in the same lamp, then it is worth checking the condition of the base, since in most cases it can be in it.

How to change a halogen bulb in a suspended ceiling
As a rule, halogen lamps are used for indoor and outdoor lighting, in floor lamps. The algorithm for the removal of the light source in all cases will be similar, it is enough to adhere to the following dismantling algorithm:
- Turn off electrical energy in the room, which will protect a person from electric shock.
- After this, it is necessary to slightly press the halogen lamp at one end of the base into the cartridge, after which the second end should be pulled towards you, while at all stages of unscrewing it is worth holding a glass flask.
- The new light sources are then inserted into the lampholder, pressed a little on it and lead the opposite end of the lamp into the second end of the lampholder.


The halogen lamp should not subsequently dangle in the lampholder.

How to get a tungsten light bulb from a suspended ceiling
Tungsten bulbs are most often called the Illich lamp. Despite the fact that such light sources are no longer popular due to the low operational life and high consumption of electric energy, they can still be found in suspended ceilings. As a rule, such bulbs are twisted counterclockwise; their replacement does not cause any particular difficulties.

How to change a fluorescent lamp in a suspended ceiling
As practice shows, for suspended ceilings, you can use fluorescent lamps of several modifications:
- fluorescent tubes
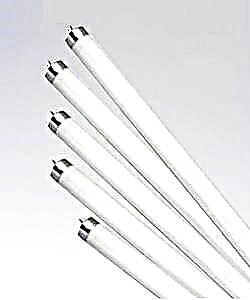
- classic glass flasks.


The tubular body, as a rule, must be installed in the contact panel of the lighting device, which has a starter device. To remove the housing from the socket, you will need to remove the protective casing, which is pre-pressed in the longitudinal direction, rotated and pulled out of the socket. Installation work must be carried out in the reverse order.
The process of replacing fluorescent housekeepers with helical cartridges is performed in the same way as conventional incandescent lamps. If the cap is a bit stuck in the cartridge, then it is necessary to twist the lamp in rotating movements.

How to change fiber optic bulbs in a suspended ceiling
Today, fiber optic light sources are the most reliable, their service life can exceed 10 years. Due to the high level of strength, they can be used in any room, regardless of the level of humidity and temperature conditions.
Since fiber-optic lighting devices are small and, if necessary, they can change the color of the glow to any shade, they are most often used to arrange the starry sky in suspended ceilings.
Many experts consider such bulbs to be eternal, since they are less likely to burn out than all other types. If one of the lamps burns out, it must be immediately removed through the existing hole in the stretch ceiling and a new one should be installed in its place.

How to replace a broken lamp
There are times when a lamp bursts in a lighting fixture. Before removing the flask, it must be pasted over with a small amount of adhesive tape. In halogen lamps, as a rule, the glasses are quite thick, as a result of which adhesive tape is used to prevent leakage of gases and the appearance of sharp chips, which can cause serious injury.
Things are much more complicated with fluorescent lamps. Before removing the flask, it is recommended to put on a tight bag on it, which will prevent the appearance of a large number of fragments throughout the floor. The most unpleasant moment is the case when the bulb flies into small pieces, and the base, as before, is in the cartridge. In such situations, it is necessary to completely remove the panel from the suspended ceiling, and then disassemble the socket.

How to remove a spotlight from a false ceiling
If there is a need to remove a spotlight from a suspended ceiling, then it is necessary to carry out dismantling in stages. The algorithm for dismantling the lighting device is as follows:
- First of all, it is recommended to remove the protective glass, if any. After that, the bulb is gently twisted out of the spotlight cartridge.

- After that, it is necessary to pry the decorative strip from the outer edge. For the convenience of dismantling, you can use a screwdriver or a knife. As a result, a small gap should be obtained, into which a flat screwdriver is inserted immediately.
- The lamp housing should be pulled out at the moment when there is a gap into which you can stick your finger in your hand. It is in this position that you can reach with your fingers to the locking elements, which must be pressed against the housing of the spotlight and carefully dismantled it.


If you want to completely pull out the light fixture, then it is worth unscrewing the bolts located on the terminal block.

How to replace bulbs with lampholders E14, E27
The process is similar to changing lamps in a chandelier or sconce with conventional cartridges. The old product is unscrewed by moving counterclockwise. When replacing lamps, their type must be considered.
For example, it is forbidden to touch halogen lamps with bare hands, as they appear greasy prints. From this, when using them, dark spots appear, and the product burns out in the near future. Usually these are models with a base such as the G4 or G9, but also others.

G4-G9 products do not have additional fixture to the lamp housing. To remove the bulb, you need to take it by the bulb and pull it down. When working with halogen products, you should use napkins or gloves, you can partially wrap the flask with paper tape.
Replacing luminaires in a stretch ceiling
Before you change the LED bulbs in a stretch ceiling, you must remember that some of them represent a single whole with the lamp. In this case, it is necessary to change the lighting device. By the way, the lamp is not held in a film sheet, but due to the presence of a mounting platform.

- Acting carefully, bend the lamp with your hands, which is mounted on two bursting springs. When dismantling, they must be held in order not to damage the canvas.
- Springs are squeezed inward and take out the device, pulling down.
- The power plug is disconnected, and a new spot is placed in its place.
- The fingers are folded in by the fingers and placed in the ring of the mounting platform. The main thing is that the device does not hang on the film. The springs must fall precisely into the ring behind the film.

Often made mistakes
The instruction on how to change a light bulb in a suspended ceiling provides for turning off the power. But not everyone adheres to this rule, which can result in a shock.
Another common mistake is to replace the lamps immediately after a power outage. The fact is that spotlights illuminate and if you touch them right away, you can burn your hands while under the ceiling. You need to wait a few minutes, and only then proceed with the replacement.