Nobody wants to do extra work. In addition, hard putty is a long difficult process that takes a lot of time. A reasonable question arises - why putty the even surface of drywall sheets. Maybe with the finish you can do without it? With some types of finishes it is possible, but not with all.
It is always necessary to close up the joints of sheets, corners and caps of self-tapping screws. Under any type of finish. Be sure to putty GKL for painting. The drywall surface is far from ideal, and new irregularities are added during transportation and installation. If you paint the surface without prior alignment, they will all be clearly visible, especially if there is even a small degree of gloss.
Preparation of drywall for gluing wallpaper - you can only putty the seams, after priming the surface
Knauf - one of the leaders in the production of drywall - allows tiles and wallpaper not to putty the entire surface of the sheets. Only joints, corners and screws. No one putsty under the tile, but yes under the wallpaper. And all because the wallpaper pasted without pre-processing in some places comes off with cardboard and sometimes up to plaster. So the second time putty is simply inevitable.
You can do without puttying the entire surface of the sheet using a primer. In this case, the primer is water-dispersed acrylic paint diluted with water. It creates a film on the surface with which the adhesive interacts well, but also this film does not damage the cardboard when tearing off the wallpaper.

Putty must be puttied, drywall completely, and to an ideal state
So, it is absolutely necessary to putty drywall completely for painting, preferably under wallpapering (at least in one layer) and seal only self-tapping screws and seams under the tile.
Gyskarton primer: why, what and when
The primer has two different functions. First, it improves the adhesion (adhesion) of the two materials. As a result, during puttying, the chances of bubble formation and material peeling are reduced. The second function - it evens out the absorbing ability. The result is less material consumption, and when puttying a more even surface. So it is undesirable to pass the primer.
Primed during finishing work, in theory, it is necessary before each new operation. For example, before puttying, a primer for drywall sheets is needed to improve adhesion with puttying. Before painting or wallpapering - to reduce the consumption of paint and glue. A primer is also needed before applying the topcoat - you have to level the starting coat, which makes the surface dusty. Without soil treatment, the finish layer lays down poorly, rolls and can even fall off.
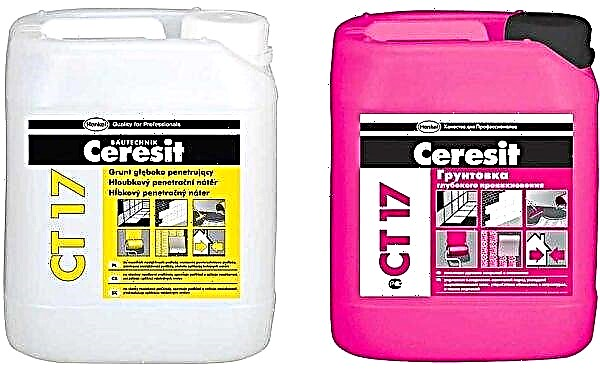
Ceresit drywall primer is also suitable for interior use.
What primers are needed? Depends on the stage and on the type of finishing material:
- Before puttying the drywall (start and finish), a deep penetration primer is used or for porous, well-absorbing surfaces.
- The same composition can be used before painting and wallpapering.
- Under the wallpaper, the plastered GKL surface can be primed with wallpaper glue diluted with water. Proportions are indicated on the package with glue.
- For painting, you need to look at the recommendations of the manufacturers. Sometimes the primer is paint diluted with water. If no other indications are available, use deep penetration composition.
To summarize, it is worth saying that the primer is a necessary operation. It allows you to get a good result and reduce material consumption.
Technology: Workflow
After the GKL sheets are fixed on the frame, it is time for the preparation of drywall for the finish. Consider the full-cycle case - for painting. In this case, plasterboard must be putty in at least two layers. For other types of finishes that are less demanding on surface quality, we simply remove unnecessary steps. The order of work is as follows:
- Primer deep penetration.
- Sealing holes from screws.
- Putty joints using a net-sickle or special paper tape.
- Sealing corners - external and internal.
- Drywall primer.
- Puttying the entire surface with the starting compound and polishing irregularities.
- Primer for drywall.
- Hard putty with finishing composition and hard putty of irregularities.
- Finishing primer.

Do-it-yourself plasterboard putty - we study the nuances
A few words about which putty is better to use for drywall. Any one will do - based on gypsum or polymers (latex). Polymer putties are usually finishing - they give a very thin layer and a flat surface. Gypsum is both starting and finishing. The difference in particle size. You can use any, if only the quality was good.
There are two forms of putty release for drywall - dry in bags and diluted in buckets. Dry before use should be diluted with water in the indicated proportions and stirred until the lumps dissolve. The compositions in the buckets are already ready for work, but cost more. But guaranteedly do not have lumps.
Primer coating
Before plastering plasterboard, primer the surface. Any soil is applied on a dry, clean base. Therefore, we first remove pollution from the surface, remove dust (you can use a vacuum cleaner or a slightly damp cloth). After this, we prepare the soil according to the instructions (sometimes it is necessary to dilute with water, sometimes just stir it), pour it into a container and apply with a brush or roller.
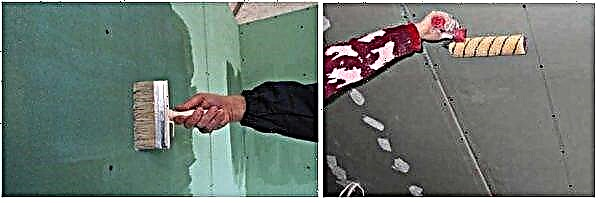
Primer application: choose a method convenient for you
Drywall primer is for dry and wet rooms. For the bathroom and kitchen, choose the soil for wet rooms, for the rest you can use any. When choosing a soil, pay attention to the presence of antibacterial components. They prevent the development of mold and mildew. This is especially true for the kitchen and bathroom.
| Title | Consumption | Appointment | Drying time | Additional properties | Price |
|---|---|---|---|---|---|
| Penetrating soil Optimum (10 l) | 6-8 sq.m / l | For priming brick, concrete, drywall in dry rooms. | 30-40 min | 600 rubles per 10 kg | |
| GLIMS Grunt / GLIMS Grunt (10 L) | 5 sq.m / l | For rooms with normal and high humidity | 30 minutes | Antifungal and anti-mold additives | 600 rub for 10 l |
| Tex Station wagon primer acrylate | 5-14 sq.m / l | For priming porous surfaces, including gypsum plaster and puttying surfaces | 30-40 min | For dry rooms and rooms with high humidity | 650 rub for 10 l |
| Primer internal Prospectors 10l | 5-10 sq.m / l | For priming porous surfaces, including gypsum plaster and puttying surfaces | 60 min | Antifungal and anti-mold additives | 350-400 rub for 10 l |
| Feidal Tiefgrund LF 10 L | 10 sqm / l | For highly absorbent surfaces, including drywall | quick drying | For indoor and outdoor use, frost resistant | 850 rub for 10 l |
Usually, to apply a drywall primer, it is enough to apply the composition in one layer, but in a kitchen or bathroom you can do two: to guarantee the result. After the soil has dried (the time is indicated in the instructions), you can proceed to the next step.
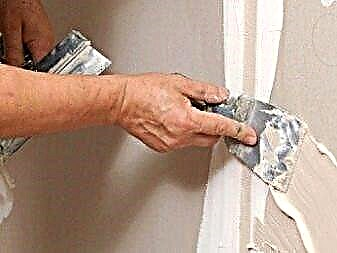
Sealing screws and seams
For joints, there are special compounds Knauf-Fugen, Knauf Uniflot, Fugenfuller and their analogues. After the soil has dried, we spread the putty to the consistency of thick sour cream. Please note that these putty dries quickly, so at a time dilute a small amount.
We take a small spatula, apply the composition to the installation sites of the screws, remove the excess. Putties in this place should be exactly so that the surface is flat. Thus we go through all the screws. They can be repaired in parallel with the seams, but you can - in the first place. It does not matter.

The principle of work with putty - a roller from the composition is laid on the edge of the spatula, then it is stretched in the right place
Drywall joints are of two types. Along the long side of the GCR, the edges are uneven - for an easier termination of this joint. But the sheets are connected and in height, where there are no ledges. You also have to cut the sheets and the connection is also obtained end-to-end. Such compounds require special technology and about it a little lower.
Vertical joints
When plastering the vertical joints of drywall with normal factory edges, they are first carefully filled, then glued.
After filling, while the composition has not yet dried, it is glued with a net of serpentine or paper reinforcing tape. This is necessary so that cracks form at the joints. If you use a tape, it is torn into the necessary pieces, soaked in clean water for 10 minutes (until the seam is filled).
The tape is recessed to the desired distance
After filling the seam, the tape is pulled out, holding between the fingers remove excess water, stick to the seam. After they take a spatula with a width of 8 cm (always necessary) and press the tape below the surface of the gypsum plaster. She "sits" on one of the factory ledges. The indentation begins from the middle to the edges. When pressed, putty is squeezed out from under the tape, we collect it. As a result, if you attach a wide hard spatula to the surface (at least 20 cm wide), you can see that the tape is below the surface of the cardboard. Then they again pass putty, aligning the joint to a level with the surface.
Trim seams
Putty plasterboard in places of horizontal joints - where two plates are connected or on vertical, but without edges, it is better after preliminary processing. First, the surface is moistened with water - dip the brush in water and grease the joint well. Walk a few times - so that the plaster gets wet. Then cut the grooves with a sharp knife at an angle of 45 °. The processing of these joints can be carried out before the primer. It is even more convenient.

Preparing joints for putty
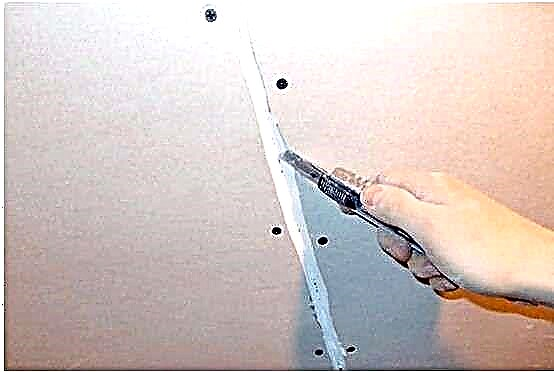
We coat the prepared joints with soil. In this case, it is more convenient to use a brush. After drying, fill the seam with a composition for puttying the joints of drywall. It is more convenient to work with spatulas with a width of 10 cm and a rigid one of 20 cm. We apply the composition to small ones, remove excesses with large ones. We fill it well by pressing the composition into the seam. If you did everything right, a small roller forms, slightly bulging above the surface.
Once again we pass the seam, applying fresh putty about 0.5 mm thick, take a soaked reinforcing tape and glue it to this composition. We take a spatula with a width of 8 cm and well press the tape to the surface, squeezing the excess putty from under it.

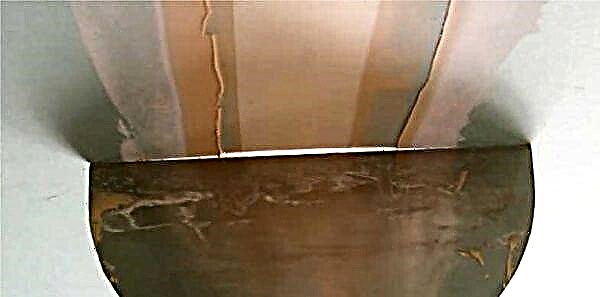
Hard putty of cut seams on GKL
In this case, a wave of paper forms (see photo), we make sure that it does not jam, we catch it to the end, where it straightens out. We remove the excess solution in the tape and the adjacent area of the sheet. And the last stage - again we take the putty and with a thin layer we coat the glued tape on top. We make this layer as thin as possible, as they say - “on the seam”. Actually, the remaining putty is stretched with a very thin layer.
Second technology: first tape then putty
There is a second technology - first, a sickle or paper reinforcing tape is glued onto gypsum, then it is puttyed. This is faster, but the disadvantage is voids that remain under the tape. In these places, wallpaper may wrinkle or putty or decorative plaster may crack.
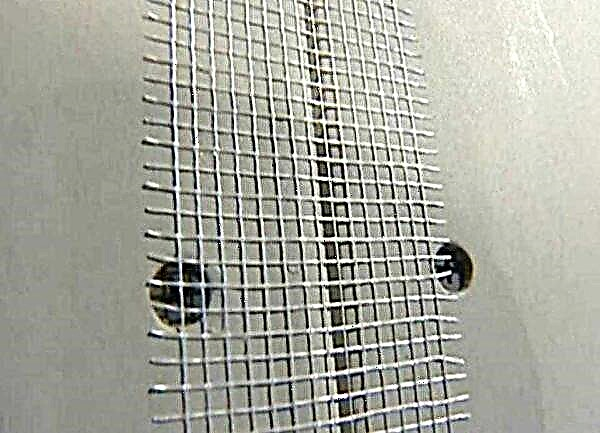
So paste a sickle on drywall
Instead of paper tape, they use a serpentine net. Serpyanka is more difficult to work with - it is tough and its edges often stick out of the solution. To make it a little easier, the mesh is pre-glued, after the glue has completely dried, it is puttyed. In order not to think about glue and speed up work, they use a self-adhesive serpyanka (there is one).

An example of a putty of a seam with a sickle
But, anyway, it is so more difficult to putty drywall - its surface is uneven, the spatula “jumps” on the fibers and a shallow wave is obtained, which is not easy to smooth out.
Outer and inner corners
External and internal corners on the walls and partitions of gypsum are made using:
- reinforcing paper
- serpyanka,
- perforated aluminum corners,
- special metal corners of chitrock with paper.

Perforated corners are different, but it’s more convenient to work with the metal corner of Shitrok
Paper and serpyanka most often finish the internal corners - the junction of the walls, as well as the walls and ceiling. The technology is similar to grouting. A certain amount of putty is applied to the corner, paper or sickle is glued on it, a reinforcing strip is pressed into the composition with a narrow spatula, the excess putty is removed. After that, they once again pass the corner, applying putty with a thin layer on top.
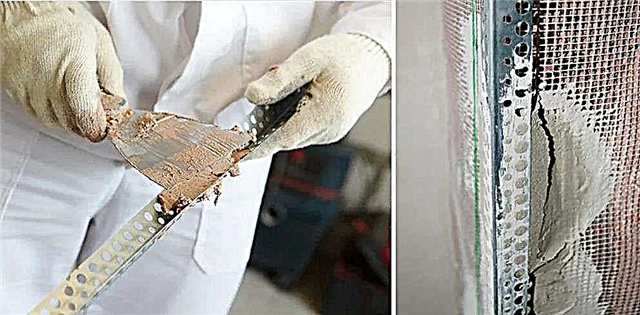
Perforated corners are used to design the outer corners - slopes, protrusions, etc. First, a piece of the desired length is cut. The metal is very thin, cut even with ordinary large scissors, but if there are metal scissors it’s easier to work. The edges are cut at an angle of 45 ° or less, and not at 90 °. So, when puttying drywall, the edge will not wrap.

Making the outer corners of plasterboard walls with a perforated corner
Puttying on small islands approximately every 10 cm (on a checkerboard pattern) is applied to the outer corner on both sides. A perforated corner is pressed into the solution, the verticality or horizontalness of its installation is checked, and corrected. Pick up the excess solution with a spatula, aligning the edges in one plane with the surface of the sheet. The installed corner is left for some time - until the putty dries, after which it is ground, putty again if necessary.
What is the difference between the Sheetrock metal corner? Thin strips of metal are applied on a paper base. They are more rigid than simple reinforcing paper, but it is more convenient to work with them than with ordinary perforated ones, since due to the presence of paper, the transition to the plane is smoother.
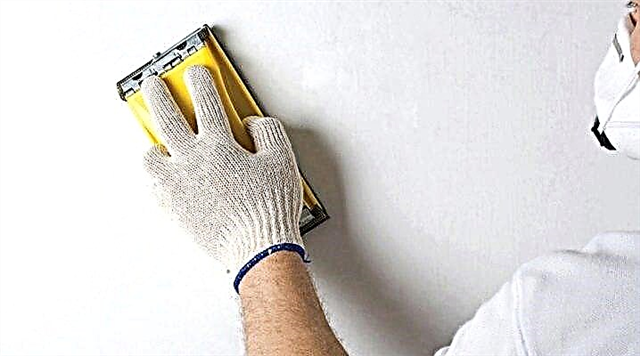
Grinding joints and corners
If the layer is well aligned during the repair of drywall joints, sanding can be minimized. Why is it better to grind less? Because firstly, it is a long time, and secondly it is dusty. Moreover, the dust is very fine, flies in the air for a long time and rises again from any movement. To reduce the amount of flying dust, wet rags, wet sawdust, etc. can be laid on the floor. Doors leading from the premises are covered with a wet cloth; it should be larger than the size of the door - so that dust does not fly into other rooms.
To begin with, you can walk with a sharp, even spatula, cut off all the most prominent bumps. Next is the grinding process. Since the corners and seams at this stage do not need to be cleaned to perfect smoothness, they take a mesh for grinding with a cell for 180-200 and a wooden block. A grid is attached to the bar (you can use brackets from a construction stapler, but the brackets should not stick out). This device level the surface. When working, it is desirable to highlight it with an oblique light - so all the irregularities are more visible. But you can not putty drywall under the wallpaper so carefully.

There are special grips for the net, but you can get by with a bar
One point is to grind better in a respirator and goggles. Gloves will not be superfluous. The dust is very fine and penetrates literally everywhere. After the seams and corners are sanded, the surface is primed again. Moreover, all completely, since dust also settled on untreated areas, and it impairs adhesion.
The most inconvenient places for putty and grinding are internal corners. The secrets of fast high-quality grinding of corners see in the next video.
How to putty drywall: align the plane
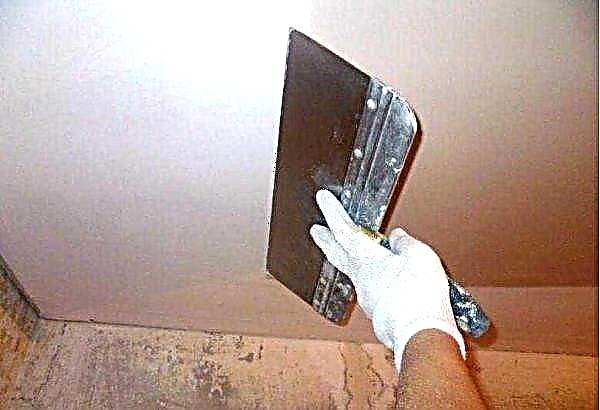
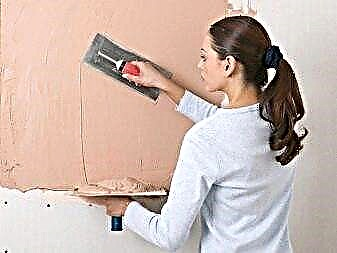
To putty surfaces you will need a large spatula - with a blade of 40 cm or more and a narrow one - 10 cm.The first layer is applied by starting putty. It is laid with a layer of about 5 mm (the maximum must be seen in the instructions for the particular putty) and hides all the bumps. Dilute it with water to a state of thick sour cream, stir thoroughly so that there are no lumps.

Such spatulas are needed for plasterboard plastering over the entire surface.
The technique of puttying the surface of drywall is simple: take a large spatula, at its end with a small spatula, put the roller out of the putty. Press the blade to the surface and stretch the composition. Repeat several times, filling a piece of the wall or ceiling. Then we clean the blade, and draw along the just putty surface, leveling it. It is necessary to level as carefully as possible - less time will be required for grinding.
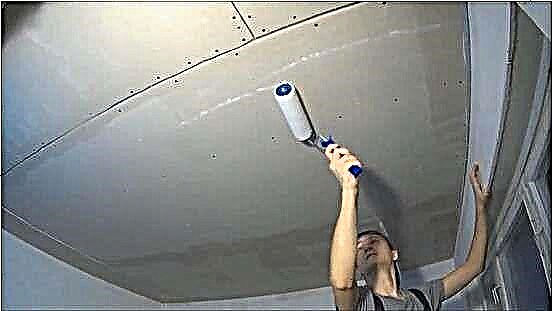
When the plasterboard is finished putty, wait until it dries. Then you take an already familiar tool - a bar with a grid and align all the flaws. Grinding is finished, remove dust, surface pass again with a deep penetration primer. After drying, start applying the second layer.
So hold the spatula
Next, plasterboard must be putty with a finishing composition. As they wrote, it can also be based on gypsum, like the starting one, and maybe based on polymers. Both are suitable, but it’s more difficult to work with some - they quickly begin to slide and freeze.
Finishing putty is made more liquid and applied with a thinner layer. The application technique is similar, nothing changes. In addition, it is more difficult to work - it is worse spread, but you need to stretch it with a thin layer and quickly level it. Everything is much better on the primer, and without it, the bottom layer quickly draws moisture from the fresh plaster and it begins to roll. After applying the finishing putty, wait again until everything dries, then begin to level. But this time they’re using not a mesh - noticeable grooves remain from it, but sandpaper with fine grain. It is not so convenient to work with it - it quickly clogs, but the surface turns out to be smooth. If you prepare the surface for painting, we do the backlighting from below or from the side and you can use not an incandescent lamp, but an LED - all flaws are visible. Even very small ones.
It is difficult to describe how to putty drywall in words - movements are difficult to describe. In the video you can see how to hold the spatula, how to move it, how to apply or remove the solution. See technology in detail in the video.
Do I need to putty drywall before wallpapering
Drywall, or dry plaster, is a sheet consisting of 3 layers: a gypsum core and two cardboard shells. At first glance, it seems that it is enough to putty the seams and screws, and then the wallpaper can be glued directly to the paper.
But it is not so. From glue and paints, the moisture-resistant cardboard layer swells, deforms and can spoil the appearance of the finish. If the wallpaper is thin and light, a dark background will shine through. In addition, when it comes time to change the old wallpaper, they can come off with cardboard. Putty plasterboard is not fully allowed only when laying tiles or panels. Therefore, there are clear recommendations from technologists - you need to putty.
Do I need to prime drywall before puttying?
Primer - a special quick-drying solution that improves adhesion between materials, reduces the consumption of putty, and prevents dehydration of adhesives and paints. In addition, it additionally protects the sheet from damaging factors - humidity and aggressive effects of the components of adhesive compositions.

If the drywall is not primed before the putty, the leveling mixture will lie poorly and loosely adhere to the paper base, and the structure will be loose and fragile. It can be quickly peeled off along with wallpaper or paint, which will lead to the need for expensive repairs.

Manufacturers produce special primers for acrylic-based drywall. They are environmentally friendly, give waterproofing, resistance to mold and fungi, fire resistance, without reducing vapor permeability.

Before you putty drywall, you need to choose a primer based on operating conditions:
- For wet rooms, moisture-resistant compounds are preferred, which form a water-repellent film on the surface of the drywall.
- For heavy wallpaper, decorative plaster and tiles, deep penetration agents are designed. They additionally strengthen the base, increase its bearing capacity.
- For painting or light wallpaper, you can choose a primer with average adhesion and penetration.
Universal primers have been developed for all types of subsequent finishing. The technology provides processing not only the base for putty, but also all layers - starting and finishing.
Priming is carried out with a roller or brush. For maximum effect, the composition should be applied in 2 layers. The room must have a positive temperature. To quickly remove evaporation products from the air, it is necessary to organize good ventilation.
Putty for drywall - what to choose?
How to putty drywall largely depends on the composition and purpose of the putty. On sale you can find mixtures made on a cement, gypsum or polymer basis. Cement and gypsum are produced in bags in the form of finely ground powder. When cooking, they are diluted with water in the right proportions. Polymer putties are ready-to-use pastes packaged in buckets.

The advantages of cement putties are strength and resistance to water. Most often they are used in humid rooms for work with moisture-resistant drywall. Gypsum putties are plastic, economical in consumption and easy to sand. The scope of their application is only dry rooms.
Compositions based on polymer binders - acrylic or latex - are universal. They are not afraid of water, are well applied, polished without any problems. Fillings differ in the size of filler grains. Mixtures designed to equalize gross errors are called starting mixtures, for final fine processing - finishing. The thickness of the applied layers varies from 0.2 to 5 mm.
Modern high-quality gypsum plaster putties are environmentally friendly, resistant to shrinkage and cracking, and durable. Leading manufacturers are Knauf, Weber-Vetonit, Sheetrock, Ceresit and others.
Preparation for decoration
Before you putty drywall for wallpaper or painting, the surface of the sheets is carefully prepared:
- It is necessary to ensure that the gyro does not lean rigidly on the floor or ceiling. A small gap will prevent drywall deformation during operation.
- The trimmed edges that were formed when cutting the sheets, as well as the corners, abutments, attachment points for the sockets, air conditioners and other communications, should be chamfered using a 45 ° knife or a special small plane.

Necessary tools
For work you will need:
- medium-length roller and brush for priming,
- container and mixer for solution preparation (if dry mix is used),
- 2 spatulas - small (8-10 cm) for seams, large (40-50 cm),
- rule for controlling bumps,
- grinding whetstone, hand-held unit or electric machine with dust extraction.

After polishing, it is necessary to remove dust from the surface using a brush-brush or a household vacuum cleaner. This operation should not be neglected, since small particles deposited on the wall impair the adhesion of materials and make it difficult to putty. In addition, dust penetrates into all cracks and is dangerous for inhalation.
What is the difference between preparation for wallpaper and for painting
Although gypsum plasterboards are fairly even, with poor quality putty, joints, installation points of self-tapping screws, and incorrectly angled corners are visible. Even thick wallpapers cannot hide such defects, and when stained they become even more noticeable.
Putty for different types of finishes differs in requirements for surface quality:
- For thick wallpaper or wallpaper for painting, fiberglass, decorative plaster from materials of coarse fractions, it is allowed to putty with minor defects. Subsequently, they will be masked under the finish layer.

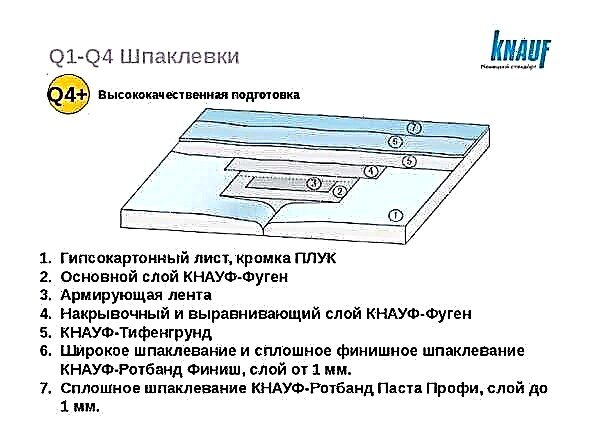
In Europe, they use their own line to indicate the quality of the surface Q1-Q4. The lowest category Q1 is used when laying panels, tiles and other piece cladding materials. Q2 is suitable for textured coatings, Q3 for matte paints, thick wallpaper. Q4 surfaces are characterized by maximum smoothness, which are prepared for materials with a fine structure, semi-gloss and glossy coatings.
Work order
Each master has his own secrets on how to putty drywall under wallpaper. Nevertheless, the work is carried out according to the technology in several stages:

- All joints and defects are carefully aligned.
- External and internal corners are made.
- Plastered areas are ground.
- The entire surface is dusted and primed.
- Putty is applied.
- Grinding and priming is carried out for subsequent finishing.
You can control the quality of the base using the directional light of a lamp or a flashlight. If defects are noticeable, it is necessary to impose the following layers to achieve the desired result.
Sealing joints, holes and defects
All recesses on the wall surface must be tightly filled with putty. Professional craftsmen recommend using the Knauf-Fugen mixture for this. It is flexible, easy to use, well fills joints.

The filler is rubbed into the defects with little effort until the moment when a material roller forms on the surface. Self-tapping screws is recommended to be processed Knauf-Fugen 2 times to avoid shrinkage.
Reinforcing paper tape or sickle are used to reinforce the seams. They protect the putty from cracking and destruction.
Sealing of joints is carried out in the following ways:
- Pre-wet the paper tape in water for better adhesion to the surface and prevent the formation of bubbles. Fill the seam with putty and glue the tape, gently pressing it with a narrow spatula. The tape should be completely immersed in the solution.
- Seam finish putty on the seam. Glue the soaked tape on PVA glue to the joint. After drying, putty the entire surface.
- When using serpyanka, the seam is also first filled with putty. Remove excess mortar from the middle with a narrow spatula, then with a hand smooth the tape strictly in the center of the joint, slightly pressing. Cover with putty using a wide spatula.

There should be no voids in the seams and holes, but under the tape or a speck of bubbles. Grinding is started after the solution has dried (10-12 hours).
Plasterboard corners putty
The technology for processing external and internal angles is different. For external corners, special perforated profiles made of galvanized steel or plastic are used. They allow you to strengthen the joint of two sheets and give the corner the correct geometry.
Previously, the plot is covered with fresh putty. The profile is superimposed on the corner and slightly pressed. A portion of the putty is applied from above and smoothed so that the corner disappears completely beneath it. You can pre-fix the profile with screws.

To reinforce the internal corners, paper tape is used. The joint must be well coated with putty. Place the tape over the solution and press firmly. Using a narrow spatula, carefully level it, then cover with a small amount of putty.
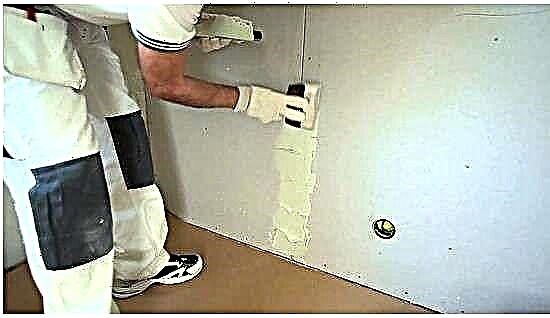
Finishing plastering of walls made of drywall for painting
The base for painting should be almost perfect. The task of finishing putty is to even out even the smallest defects.
Before you putty drywall for painting, the entire surface must be covered with a starting mixture, dried and sanded. Clean the walls from dust, prime. After drying, proceed to work:
- Thoroughly mix the composition for the finishing putty. If it is prepared from a dry mixture, you need to achieve a uniform and smooth consistency, reminiscent of sour cream.
- Spread the mass with a trowel on a long spatula and spread it on the wall.
- Then rub in a circular motion on the surface as thin as possible.
- Sequentially putty each area with an approach to the next, so as not to leave rough traces from the spatula. Movement must be done with uniform pressure.

To speed up the work and improve its quality in the corners, it is recommended to use a special corner spatula. He copes well even with inaccessible places.
The air temperature in the room should not be lower than 10%. Drying time - 8 hours. After complete drying, proceed to grinding. This is a laborious process, but the final result will depend on the quality of the work done.
Under the final finish, remove dust and apply a primer. If necessary, repeat the putty-grinding-priming cycle several times until the desired surface quality is achieved.

Conclusion
Plasterboard putty is a laborious, but certainly very important process. If it is neglected, a quick spoilage of the decorative finish and the base itself is possible. Knowing how to putty drywall for painting or wallpapering, you can avoid many mistakes, and the quality of your repair will be at its best.
Features of putty for GKL
To choose the right putty mixture, you need to adhere to a certain order of criteria. It is important to understand what kind of work the putty is intended for. If the decoration is done indoors, it makes no sense to buy a mixture for outdoor use. In addition to this, it is important to determine the type of putty: it can be starting, finishing or universal.
The operational properties that the putty must match (surface smoothness, color, ductility) are important. This also includes factors that will affect the finished surface (for example, humidity, mechanical stress). It is necessary to take into account the shelf life of this finishing material. (especially important for ready-made solutions that quickly lose their properties after dilution or opening of sealed packaging).
In addition, the price is important: it is necessary to meet the planned budget.

Types of mixtures
Putty materials are represented by an extensive assortment of various grades and types. In order to correctly determine the suitable mixture for filling gypsum plasterboard, you need to understand by what criteria they are divided. There are three main divisions of putty:
- according to the purpose - start, finish, universal,
- ready to use - dry mix, diluted solution,
- for the main component in the composition - gypsum, cement, polymer.

Let's consider the main nuances.
Start
This putty is used to align large defects, serves as the basis for finishing putty. Its distinguishing features include:
- larger particles of the mixture
- rough surface
- strength, complex grinding,
- strong adhesion, strong adhesion to the working surface,


Finish line
This variety is intended to obtain a flattened and smoothed plane, it is used mainly on a pre-processed basis. It is a good basis for various kinds of decoration (for example, wallpapering, staining). The characteristic features of the finishing putty include:
- relatively fine particles of the mixture,
- smooth and even plane after processing,
- nice appearance.

This material can be used as wall or ceiling decoration. However, this putty is fragile, although it is easy to grind. Handle such a coating carefully.
Universal
Such fillings perform the tasks of starting and finishing varieties. Such materials can be used on surfaces in any condition (whether it is almost flat walls or surfaces with cracks, chips and potholes). Universality of application simplifies the process of their use. Generally, universal putties are represented by polymer compositions. The resulting surface layer is somewhat inferior in quality to the phased finish of the starting and finishing putty.


Dry mix
This material is sold in bags of various weights. Consider its key features.
- For a qualitative result, the correct mixing of such a solution is necessary, which will ensure the uniformity of the mass and the absence of various lumps in it, otherwise the surface will be far from desired.
- The shelf life of dry mixes is much longer than other analogues. This is important if you buy material for decoration of various rooms, work in which can be carried out after a certain period of time.
- In financial terms, dry mixes are cheaper because they do not contain additional additives that maintain the suitable state of the finished solution.
- It is more advisable to use dry mixes when the ideal surface is not necessary (for example, for the starting layer or when gluing the surface with thick wallpaper).

Ready solution
The finished mixture is mainly produced in buckets of various sizes (from 2 to 40 kilograms). This material has its own characteristics.
- The finished mixture is easier to use; there is no need for kneading skills.
- The finishing layer is characterized by evenness and impeccable smoothness, this is the best option for painting or various design decisions.
- The shelf life of such putty is strictly limited and varies from the availability of special additives.
- The price of ready-made solutions, regardless of the type of putty, will be higher in composition than a similar dry mixture.

Gypsum
This putty is widely used for finishing plasterboard surfaces. Simplicity and ease of use provided her with great popularity among professionals and people who are only familiar with the finishing work. The main qualities of such mixtures include several characteristics:
- they are used as a starting and finishing layer,
- the dry mixture is diluted without much effort, it gives a soft and pleasant texture,
- they stretch well over the surface,
- they are characterized by a short period of setting and solidification,
- these compounds do not shrink, there will be no cracks on the frozen layer,
- the resulting surface is even and smooth,
- they have a pleasant aesthetic appearance (the top layer can be used as a front wall finish),
- This is a great option for painting and designer finishes,
- this putty is characterized by affordable cost,
- they are easy to grind,
- it is characterized by high ductility,
- she doesn’t have a specific building smell,
- this material can be stored for a long time at a low temperature,
- it has high heat-insulating properties and is fireproof,
- these compounds are non-toxic, their microparticles that have fallen into the air do not cause allergies,
However, the high level of moisture absorption of such putties makes it inappropriate to use this type of finishing material in rooms with high humidity. Fragility determines vulnerability to mechanical stress and vibration of the finished coating.

Cement
Putty, in which there is cement, has a budgetary cost, which makes it popular when performing a large amount of preparatory work. These materials have their own characteristics.
- For mixing, sand is used, to which strict requirements are imposed (for example, the fraction of particles should be 1.5-2.5 mm, otherwise the cracking of the finish is almost guaranteed).
- The mixture should be dissolved with water at room temperature (about 20 degrees C).
- Putty hardening speed varies in the range of 5-24 hours (depending on temperature conditions).
- The layer shrinks, which makes it necessary to reapply the composition after some time (after the first layer has completely dried).

The hardened layer is characterized by significant roughness. This composition is resistant to temperature fluctuations, it is frost-resistant, is durable and moisture resistant. However, during operation, or even immediately on the surface, cracking is possible, despite full adherence to the technology. In addition, such varieties are difficult to grind.
The standard composition during hardening acquires an unaesthetic color, although today on the shelves of construction stores there are compositions of white and superwhite shades modified with tinting pigments.

Polymer
Putty mixes based on acrylic or latex differ in the excellent appearance of the finished surface.
- They can be used for any stage of putty, however, due to the high cost they are used more often for finishing putty.
- They are sold in the form of a dry mixture and ready-made solutions.
- They give a flat and smooth surface regardless of defects in the work surface.
- This is a good base surface for painting and designer finishes.
- They improve the sound insulation of the surface.
- They are biologically inert, the coating material excludes the multiplication of microorganisms (fungus and mold).


High vapor permeability allows free moisture to evaporate under the finishing layer, as a result of which the room does not become damp. They are characterized by moisture resistance: this material can be used in bathrooms and kitchens. In addition, he has no smell.
To choose a putty for unheated rooms, you need to choose a moisture-resistant and elastic material.

How to putty?
The final result largely depends on the correctly selected putty mixture. An important factor is compliance with standards, as well as the consistent implementation of finishing work. Before carrying out work, it is necessary to prepare tools, including a corner, putty knife, level. When choosing a primer, it is worth giving preference to a composition with high penetrating ability. Consider the key points of the process.
Solution preparation
The dry mixture is diluted according to the manufacturer’s branding instructions. It is necessary to thoroughly mix the solution, after which it should be infused for about half an hour.
Before you fix the bumps, you need to stir it again.


Seam processing
The mass is applied to a large spatula with a small one, after which it is applied along the entire joint carefully so that the putty fills the recess. Further, it is uniformly extended over the entire plane.

Putty corners
The process is similar to the putty of self-tapping screws. First, the mixture is applied on all sides of the corner, after which the solution is thoroughly ground to fill the voids and evenly stretched to create a single plane.


Finish stage
First, they process those areas that were not affected, create a common putty canvas (it is better to seal in small portions). Next, leveling is performed over the entire surface with a thorough level check.

Useful Tips
When filling the surface for gluing paper wallpaper, mixing the solution must be done very carefully. The working plane should be smooth and even: this type of wallpaper tends to emphasize any flaws. If the preparation of the base is performed under gluing with heavy wallpaper, it is better to use cement-based putty.
When the putty is performed under painting, the surface is leveled to perfection.

You can learn about how to putty the ceiling from drywall from the next video.